

Thick Antialiased Lines#
The thick antialiased lines can be made by modifying the simple antialiased line. In effect the line that is one pixel wide, has two regions either side of the line that use the difference values to alter the colour of the antialiasing pixel. Low numbers are closer to the theoretical line and will be darker, whilst higher numbers will be lighter.
Antialiased line 1 pixel wide, after calculating the errors the line can be shown just by the colour change. In this example the main line follows the darker pixels with light blue values.#
It can be seen that just by adjusting the criterion to display a colour one can alter the line width provided that the algorithm moves to the adjacent pixels.

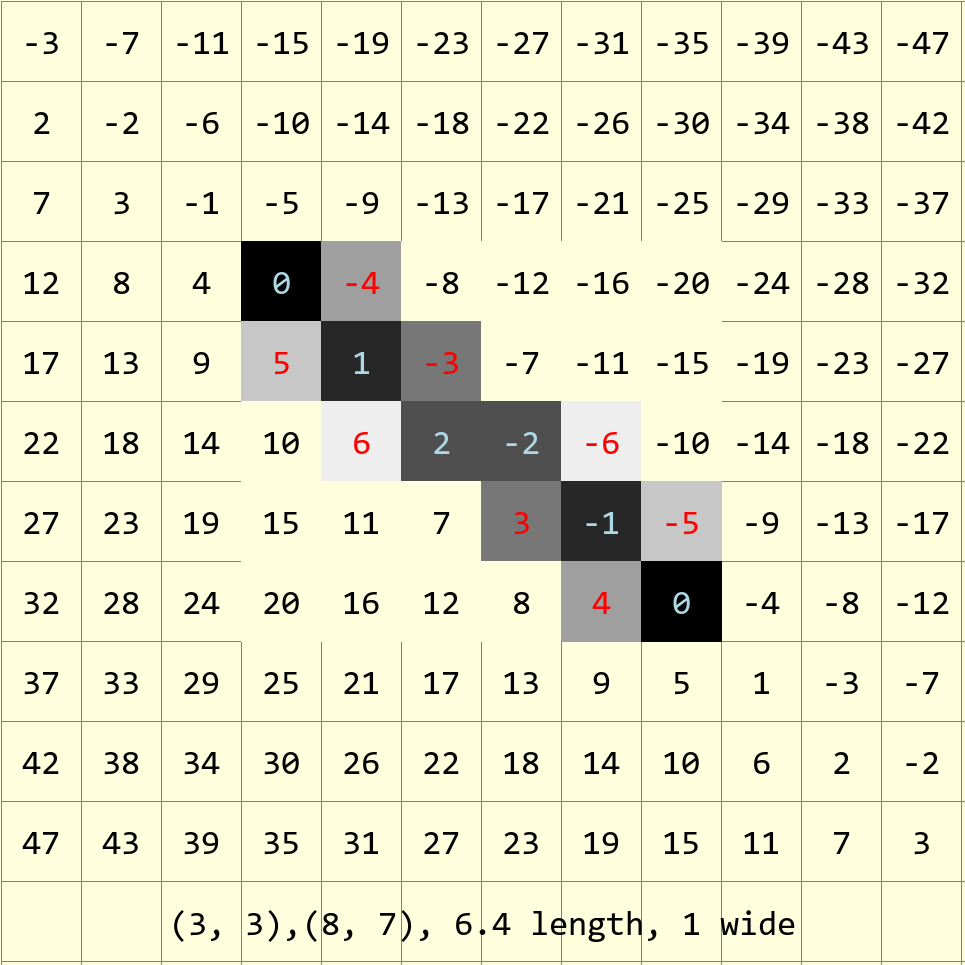
A thick theoretical line 2 pixels wide from (3,3) to (8,7), showing the differences between the pixel positions and the line.#
The light blue rectangle is a 2 pixel wide (scaled) line, a single pixel wide antialiased line would activate all pixels having a difference of 6 or less, the two pixel wide antialiased line would activate pixels having a difference of 9 or less. Pixels having a difference of 3 or less would be coloured black.
For thick lines imagine the band either side of the theoretical line. The pixels within this band will darken, corresponding to the line width, and those pixels either side and adjacent to the band will be used as antialiasing pixels. We can account for the single line thickness as having two lines of antialiasing pixels, each line corresponding to half a line width. The algorithm follows this reasoning in that the single width line is drawn first with antialiasing colours, when the two antialiasing parts are added some adjacent pixels are not coloured. Larger widths correspond to keeping the central line as before and adding the antialiasing in a larger band of antialiasing. The antialias values are calculated by dividing the line roughly in two, so that the central line darkens and the antialiasing occurs at a larger offset.
Thick Antialiased Lines
1 pixel wide
2 pixels wide
3 pixels wide
4 pixels wide
½ + 0 + ½
½ + 1 + ½
½ + 2 + ½
½ + 3 + ½
The single pixel line is antialiased by taking the absolute difference value divided by the line length (ed) multiplied by 255. Working with thick lines subtract \(ed * (width - 1) / 2\) from the difference value (negative values become zero).
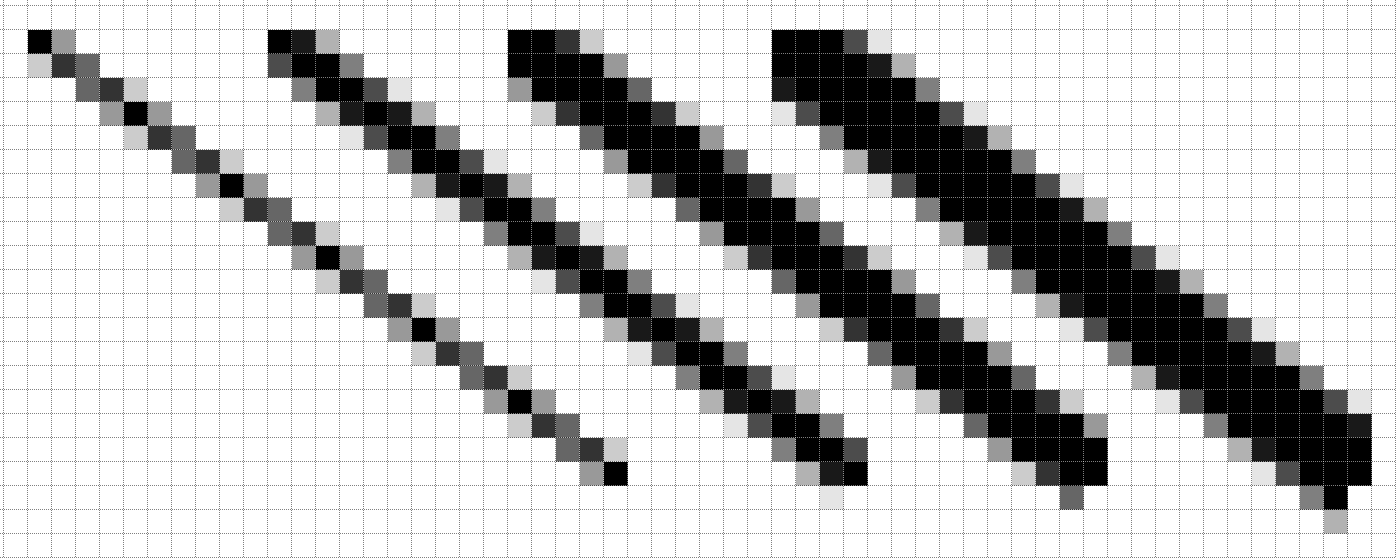
Antialiased lines 1, 2, 3 and 4 pixels wide#
There is no antialiasing before the start and the antialiasing at the end has been curtailed.
Lines near 45° look good, but at the main axes the lines are offcentre, where the lines have no antialiasing, use the ordinary line from PIL instead. Otherwise Alois has made good looking antialiased lines.
Antialias Limits#
At present the antialiasing width factor is multiplied by a common term ed, if the line is very shallow or steep, this does not always reflect the change in differences as steps are made in the x and y directions.
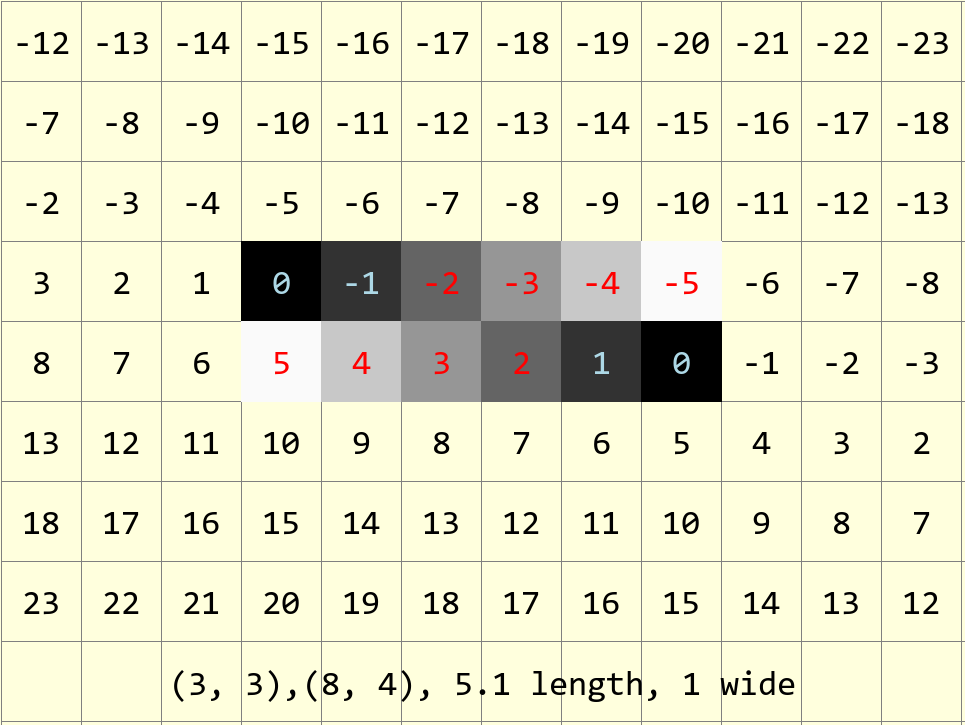
Line between (3,3) and (8,4) overall length 5.1.#
Steps in the x-direction change the differences by -1, but in the y-direction by 5. Compare these differences to the figure at the start of this section.
Show/Hide Antialiased Line Wide Lines
def plotWideLineAA(draw, pta, ptb, fill='black', width=1):

 x0, y0 = pta
 x1, y1 = ptb
 dx = abs(x1 - x0)
 dy = abs(y1 - y0)
 sx = 1 if x0 < x1 else -1
 sy = 1 if y0 < y1 else -1
 err = dx - dy
 ed = dx + dy
 ed = 1 if ed == 0 else sqrt(dx*dx+dy*dy)
 dr = dx + 1 if dx > dy else dy + 1

 for x in range (dr):
     hue = max(0,int(255*(abs(err-dx+dy)-ed*(width-1)/2)/ed))
     draw.point([x0, y0], fill=(hue, hue, hue))
     e2 = err
     x2 = x0
     if e2 << 1 >= -dx:                   # vertical aa below line
         e2 += dy
         y2 = y0
         while e2 < ed*(width+1)/2 and (y1 != y2 or dx > dy):
             hue = 0 if dy==0 else max(0, int(255*(abs(e2)-dy*(width-1)/2)/ed))
             y2 += sy
             draw.point([x0, y2], fill=(hue, hue, hue))
             e2 += dx
         e2 = err
         err -= dy
         x0 += sx
     if e2 << 1 <= dy:                   # horizontal aa right of line
         e2 = dx - e2
         while e2 < ed*(width+1)/2 and (x1 != x2 or dx < dy):
             hue = 0 if dx == 0 else max(0, int(255*(abs(e2)-dx*(width-1)/2)/ed))
             x2 += sx
             draw.point([x2 , y0], fill=(hue, hue, hue))
             e2 += dy
         err += dx
         y0 += sy
As can be seen the script closely follows the single width antialiased
line. The main differences are in how the hue is calculated,
where an amount is subtracted dependant on half the width, also the while
conditions have been extended, this allows the antialiasing to widen the basic
line. Antialising is limited by the while clause to ed*(width+1)*2 as
opposed to the original ed*width.
Reduce Antialias Duplication#
The antialias values are duplicated, so add a lookup dictionary to calculate the hue directly from the error to speed up the script:
.....
diffs = {}
for i in range(int(ed)):
    diff = int(255*abs(i)/ed)
    diffs[i] = diff
....
    hue = diffs[abs(err-dx+dy)]             # main line
....
        hue = diffs[abs(e2+dy)]             # y-step
....
        hue = diffs[abs(dx-e2)]             # x-step
Pixel differences with larger values than exist in the dictionary will produce an error. Use a defaultdict and add a default equal to the background colour (back):
from collections import defaultdict
....
diffs = defaultdict(list)
diffs = defaultdict(lambda:back, diffs)
Allow for other Colour Fills#
So far thick antialiased lines will create greys, but with a coloured line each hue component needs to be separately adjusted, not merely copied from the source to the other two components. For the best results at least one of the RGB components should be 0, which allows the colour to change across the full range.
The plan is to take each component and step through the line size (ed) and adjust the value according to the step value. Store the RGB tuple in our lookup dictionary:
....
def errs(comp, size,j):
    return 255 if comp == 255 else int((255-comp) * j / size) + comp

diffs = defaultdict(list)
diffs = defaultdict(lambda:back, diffs)
for i in range(int(ed)+1):
    if fill == (0,0,0):
        diffs[i] = tuple(int(255*i/ed) for j in range(3))
    else:
        diffs[i] = tuple(errs(fill[j],ed,i) for j in range(3))
....
            draw.point((x0, y0), fill=diffs[abs(err-dx+dy)]) # main line
....
            draw.point([x0, y0+sy], fill=diffs[abs(e2+dy)])  # y-step
....
            draw.point([x2+sx, y0], fill=diffs[abs(dx-e2)])  # x-step
....
This modification can be added to the thick antialiased lines. just remember that the input should be a positive integer after the difference is adjusted for width, however the change in colour is straightforward.